 Sagacious Suricata
Making Wi-Fi serial console adapters with old portable routers
This post is reconstructed from notes written in early February back when most of the work on the project happened, so the information might be slightly out of date. A decent amount of effort was made in keeping this information up to date, and firmware builds have been re-tested at the time of writing to ensure they all work as intended.
Serial console is one of the most important ways of communicating with embedded Linux systems. I’ve used a lot of USB serial adapters over the years, but they all seem to have two major drawbacks that are difficult to overcome:
-
They are not electrically isolated. Whenever the target board is powered up, there is always a small chance that a power surge will happen due to ground loop interference, which causes my connection to be interrupted on power-up:
FATAL: read zero bytes from port
term_exitfunc: reset failed for dev UNKNOWN: Input/output error
By the time I could reconnect with my terminal software (
picocomin this case), I would have already missed a lot of critical messages printed by the bootloader. This makes diagnosing and debugging bootloader related problems very unpleasant. To make matters worse, should something bad happens to my board and a high voltage was sent to the tx/rx pins, it can potentially go back to my computer and destroy my PCH, since EHCI/XHCI controllers are typically integrated in the PCH nowadays. -
The UART cable length limit makes it difficult to work with on a messy desk, as a USB hub or at least an extension cable would always be required, further contributing to the clutter, and the bare PCBs have risks of being accidentally shorted out by my other metallic tools if not careful.
While talking to some network engineers, I found that some people had Wi-Fi or BLE based wireless console adapters, which allow them to access the RS-232 serial consoles wirelessly. Some research later, a series of products called Airconsole from Cloudstore Limited perked my interests. From the looks of it, most of their Wi-Fi enabled options look extremely similar to a series of older “3G router” products manufactured by HAME. The Mini model looks almost identical to MPR-A5, the Std/Pro one looks almost identical to MPR-A1, and the XL looks almost identical to MPR-A2. These HAME models are later cloned by other manufacturers and then sold as generic products, and they can still be found to this day on places such as eBay and AliExpress.
With this information in mind, I figured it’s easier for me to make my own wireless serial console adapter with some of the old portable routers I have lying around. There is no need for Bluetooth connectivity or smartphone apps for me personally, all I want is something that I can connect to locally and lets me interact with a serial console over a secure connection. Transport security is highly desirable because having my login credentials transmitted in plaintext is highly undesirable, even on my own LAN.
After some consideration, I have decided running picocom over an SSH session, on a battery powered OpenWrt device would be the easiest to implement for me. SSH is the best option for me because the “trust on first use” design has a much lower setup overhead compared to a traditional PKI based TLS/HTTPS setup, while still remaining secure. OpenWrt offers an easy-to-use configuration web interface for setting up the Wi-Fi connection, has (mostly) up to date userspace software, and is pretty much the only Linux distribution that will work on these routers anyway.
Here are some alternatives solutions and ideas that were considered in my research, and why they were not selected for this project:
- esp-link: While being very affordable, it offers no transport security.
- ESP32-Serial-Bridge: Similar to the project above, but it’s transparent TCP only. Lack of transport security is still a dealbreaker.
- consrv: Go binaries are statically linked and too large for the extremely limited amount of storage space available, plus running yet another SSH server while
dropbearis already provided by OpenWrt by default feels very redundant. - Bluetooth based solutions have very limited range, and they are typically much more difficult to work with in general.
- Proprietary 433MHz/2.4GHz off the shelf serial bridges often have fixed bitrates and lack proper transport encryption.
- While not being wireless, if only electrical isolation is desired, digital isolators such as the ADUM3201 are widely available. The problem with this solution is now eight wires in total would be required, instead of the typical three, since vcc from both sides are needed for the digital isolator to function correctly.
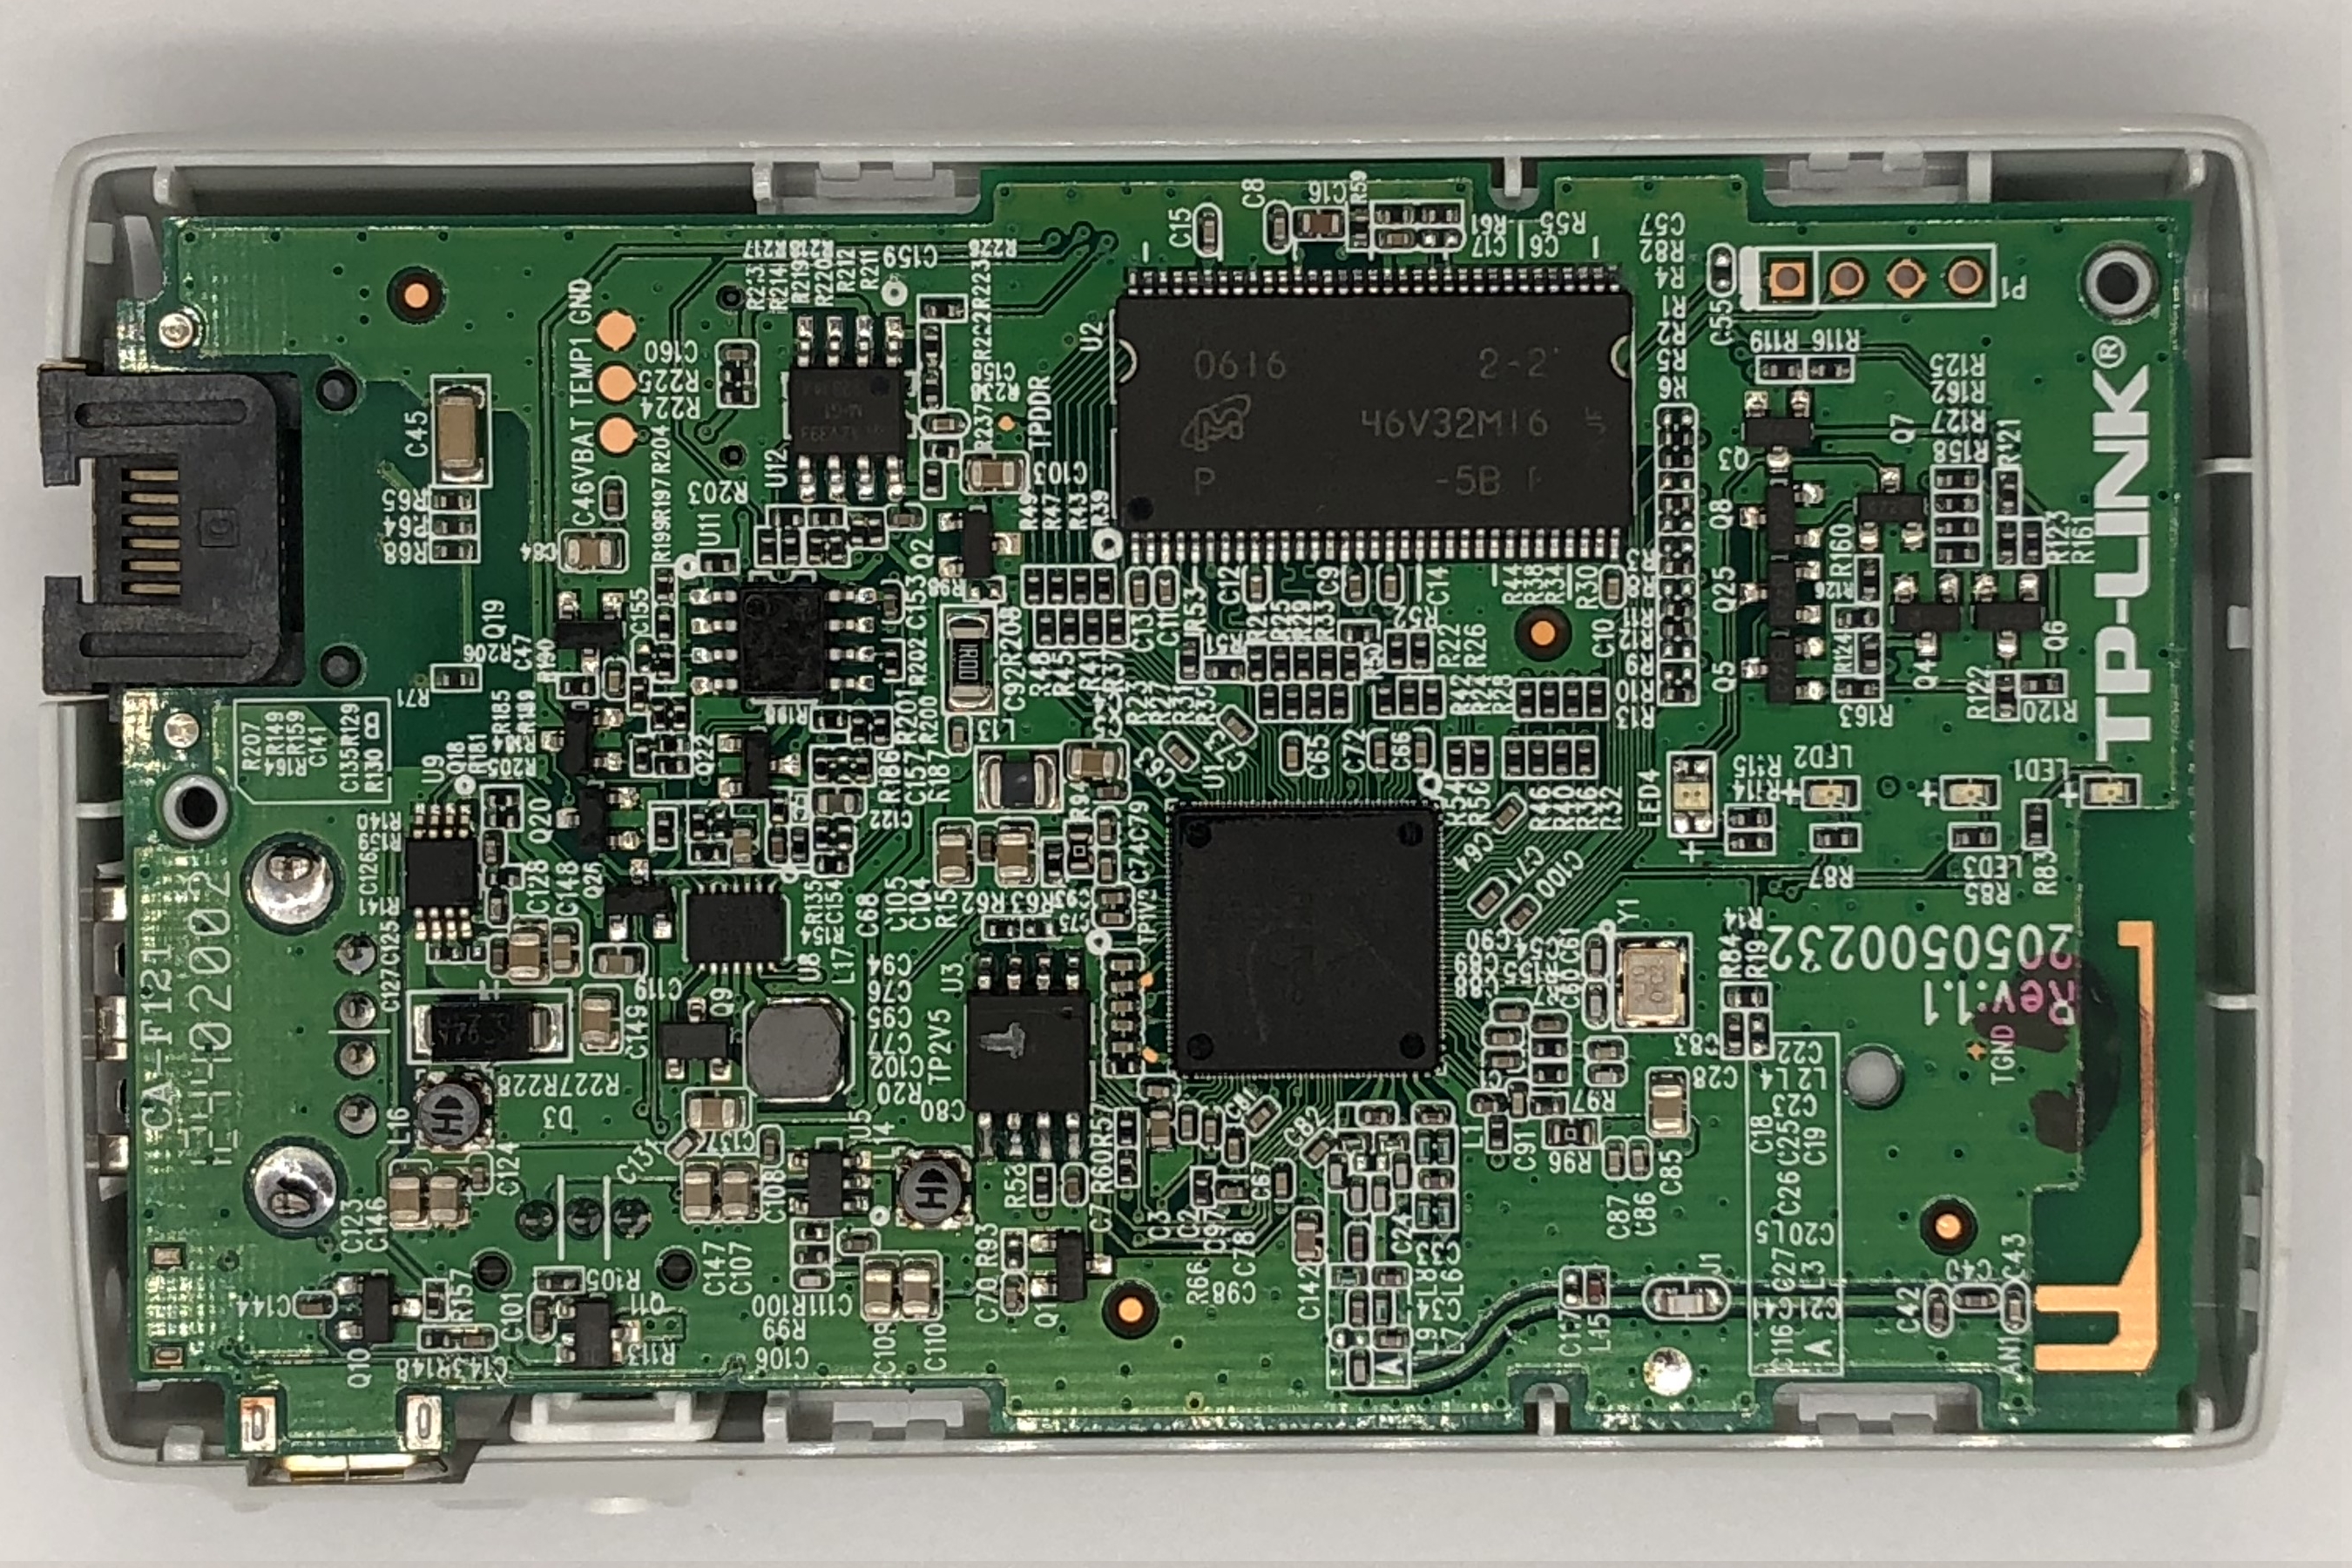
With the context out of the way, some hardware upgrades are required for me to be able to fit modern OpenWrt onto these devices in my possession. The TP-Link TL-MR11U only has 4MB of NOR flash and 32MB of DRAM. While 32MB is sufficient for what I’m going to run, 4MB is not enough to store the required software anymore. The HAME MPR-A1 only has 4MB of NOR flash and 16MB of DRAM, neither of which are sufficient for anything I need.
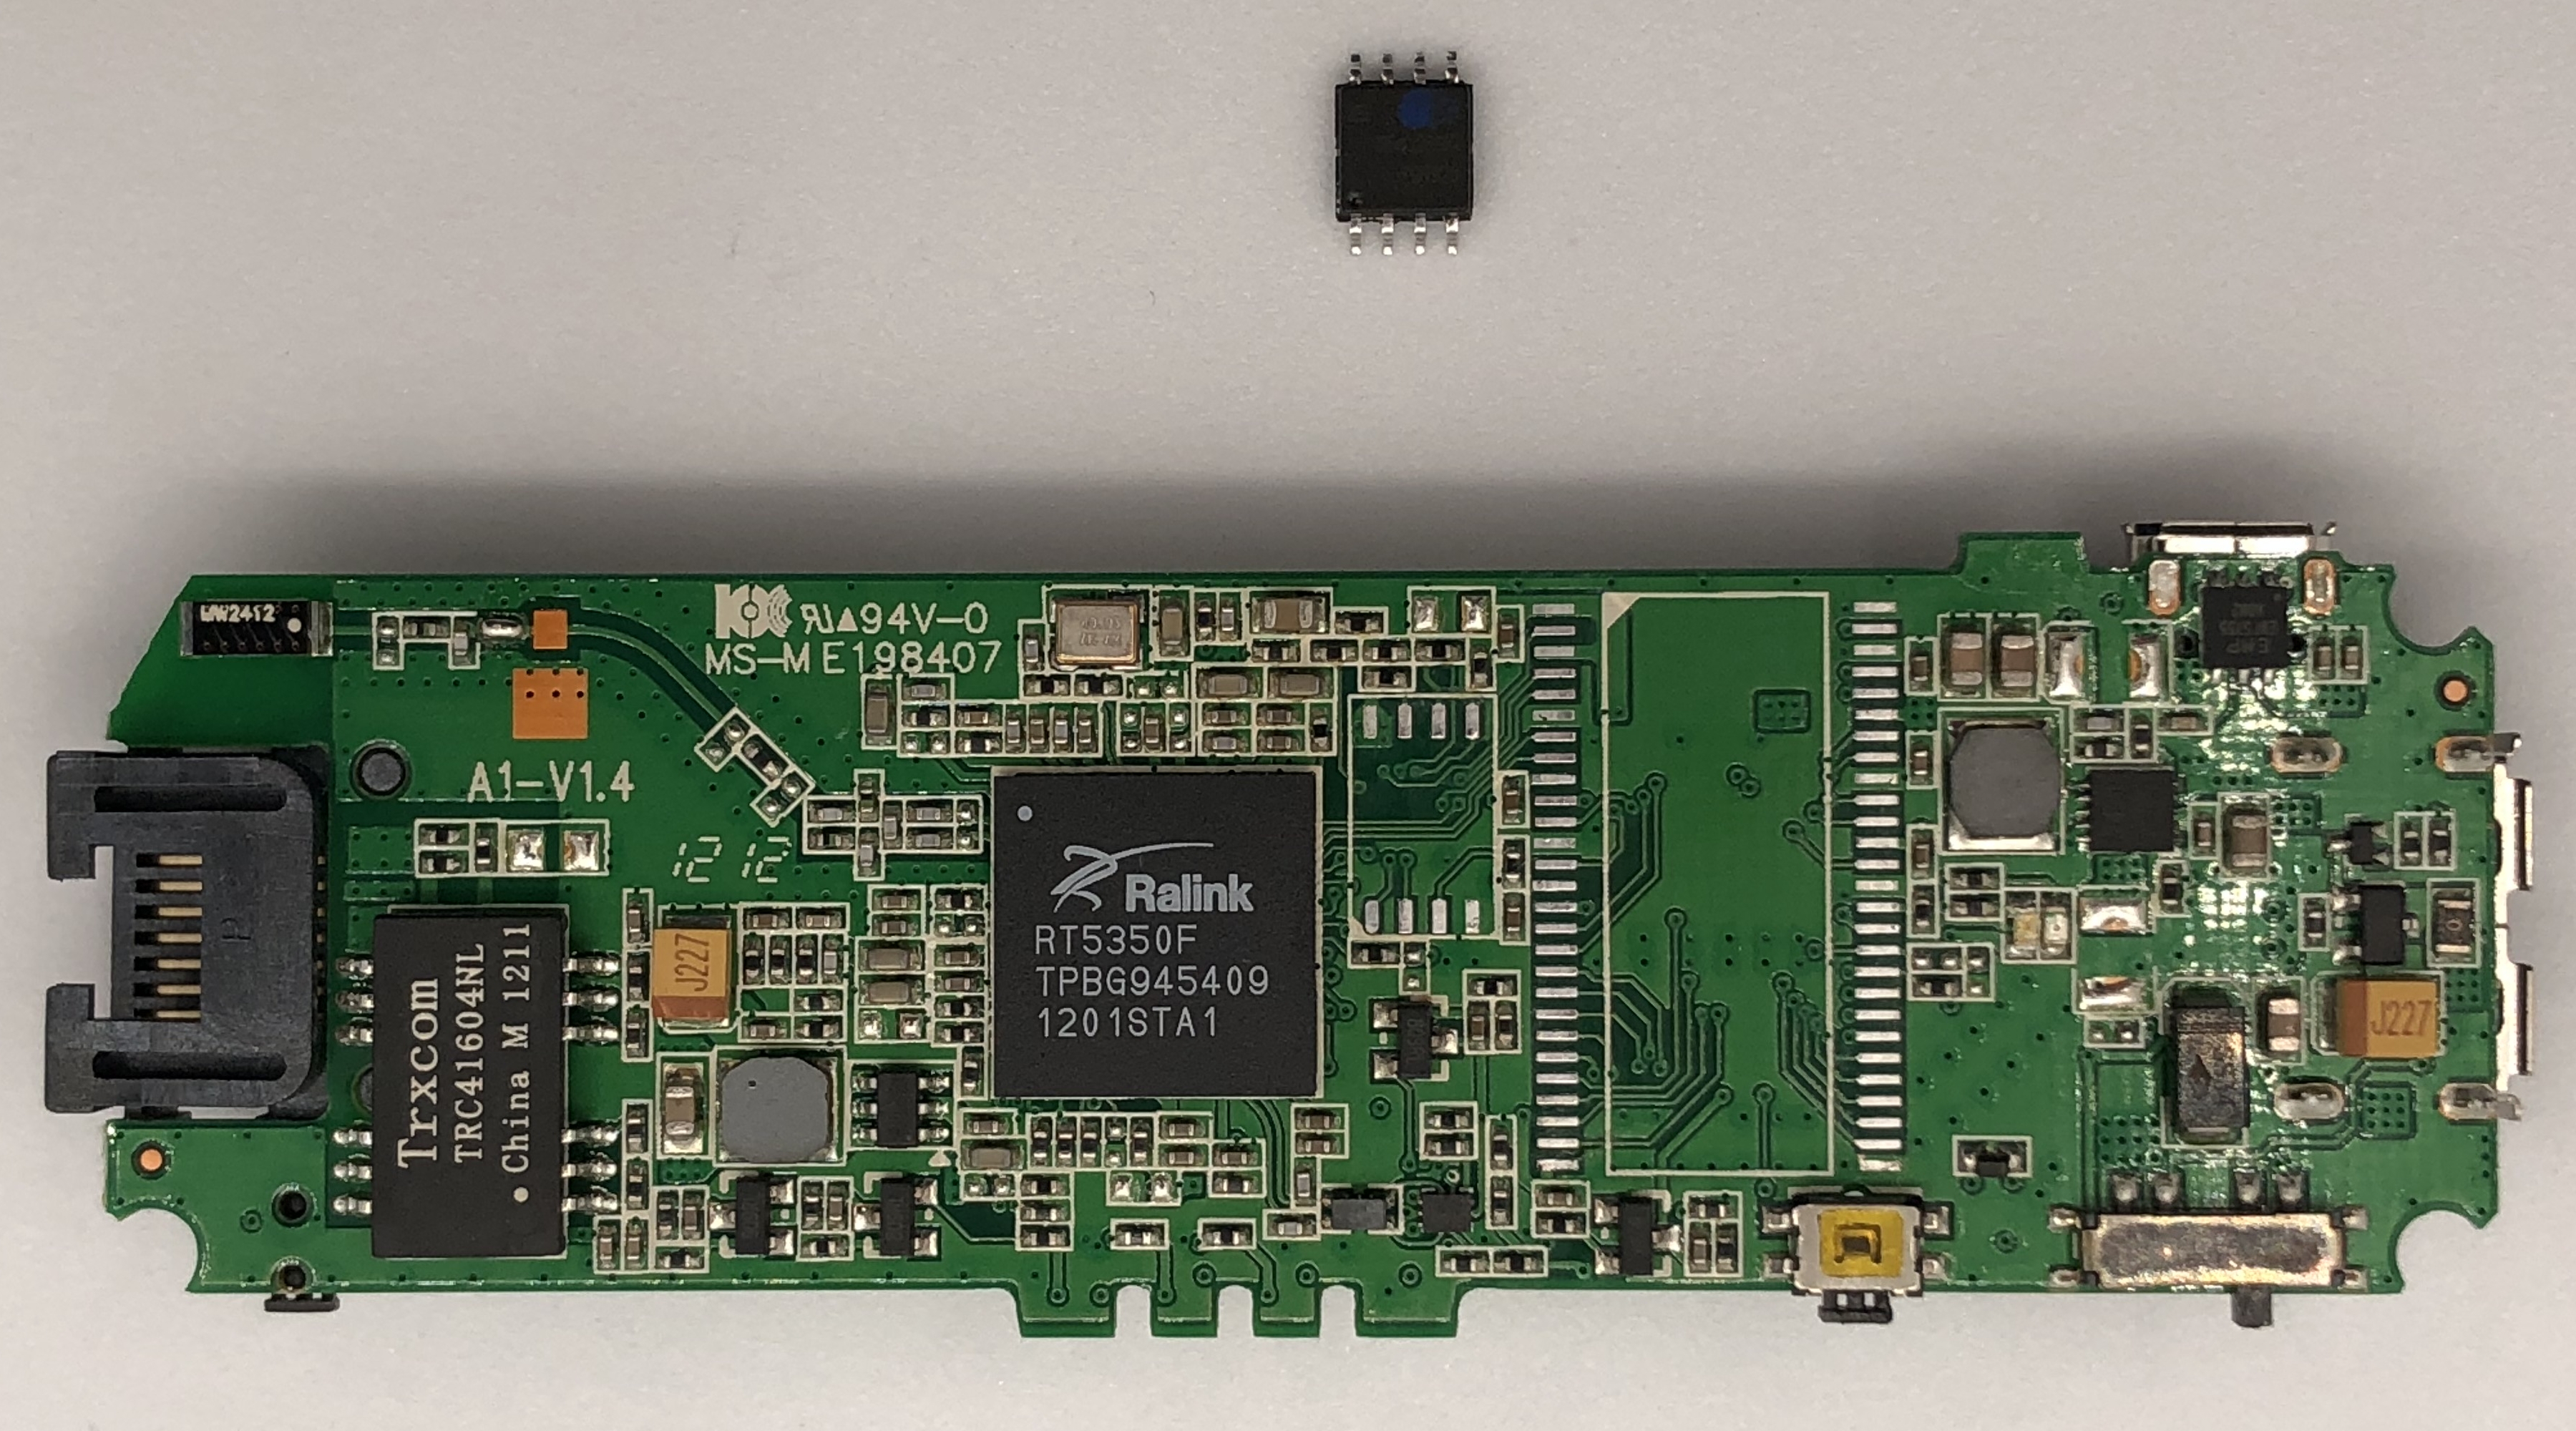
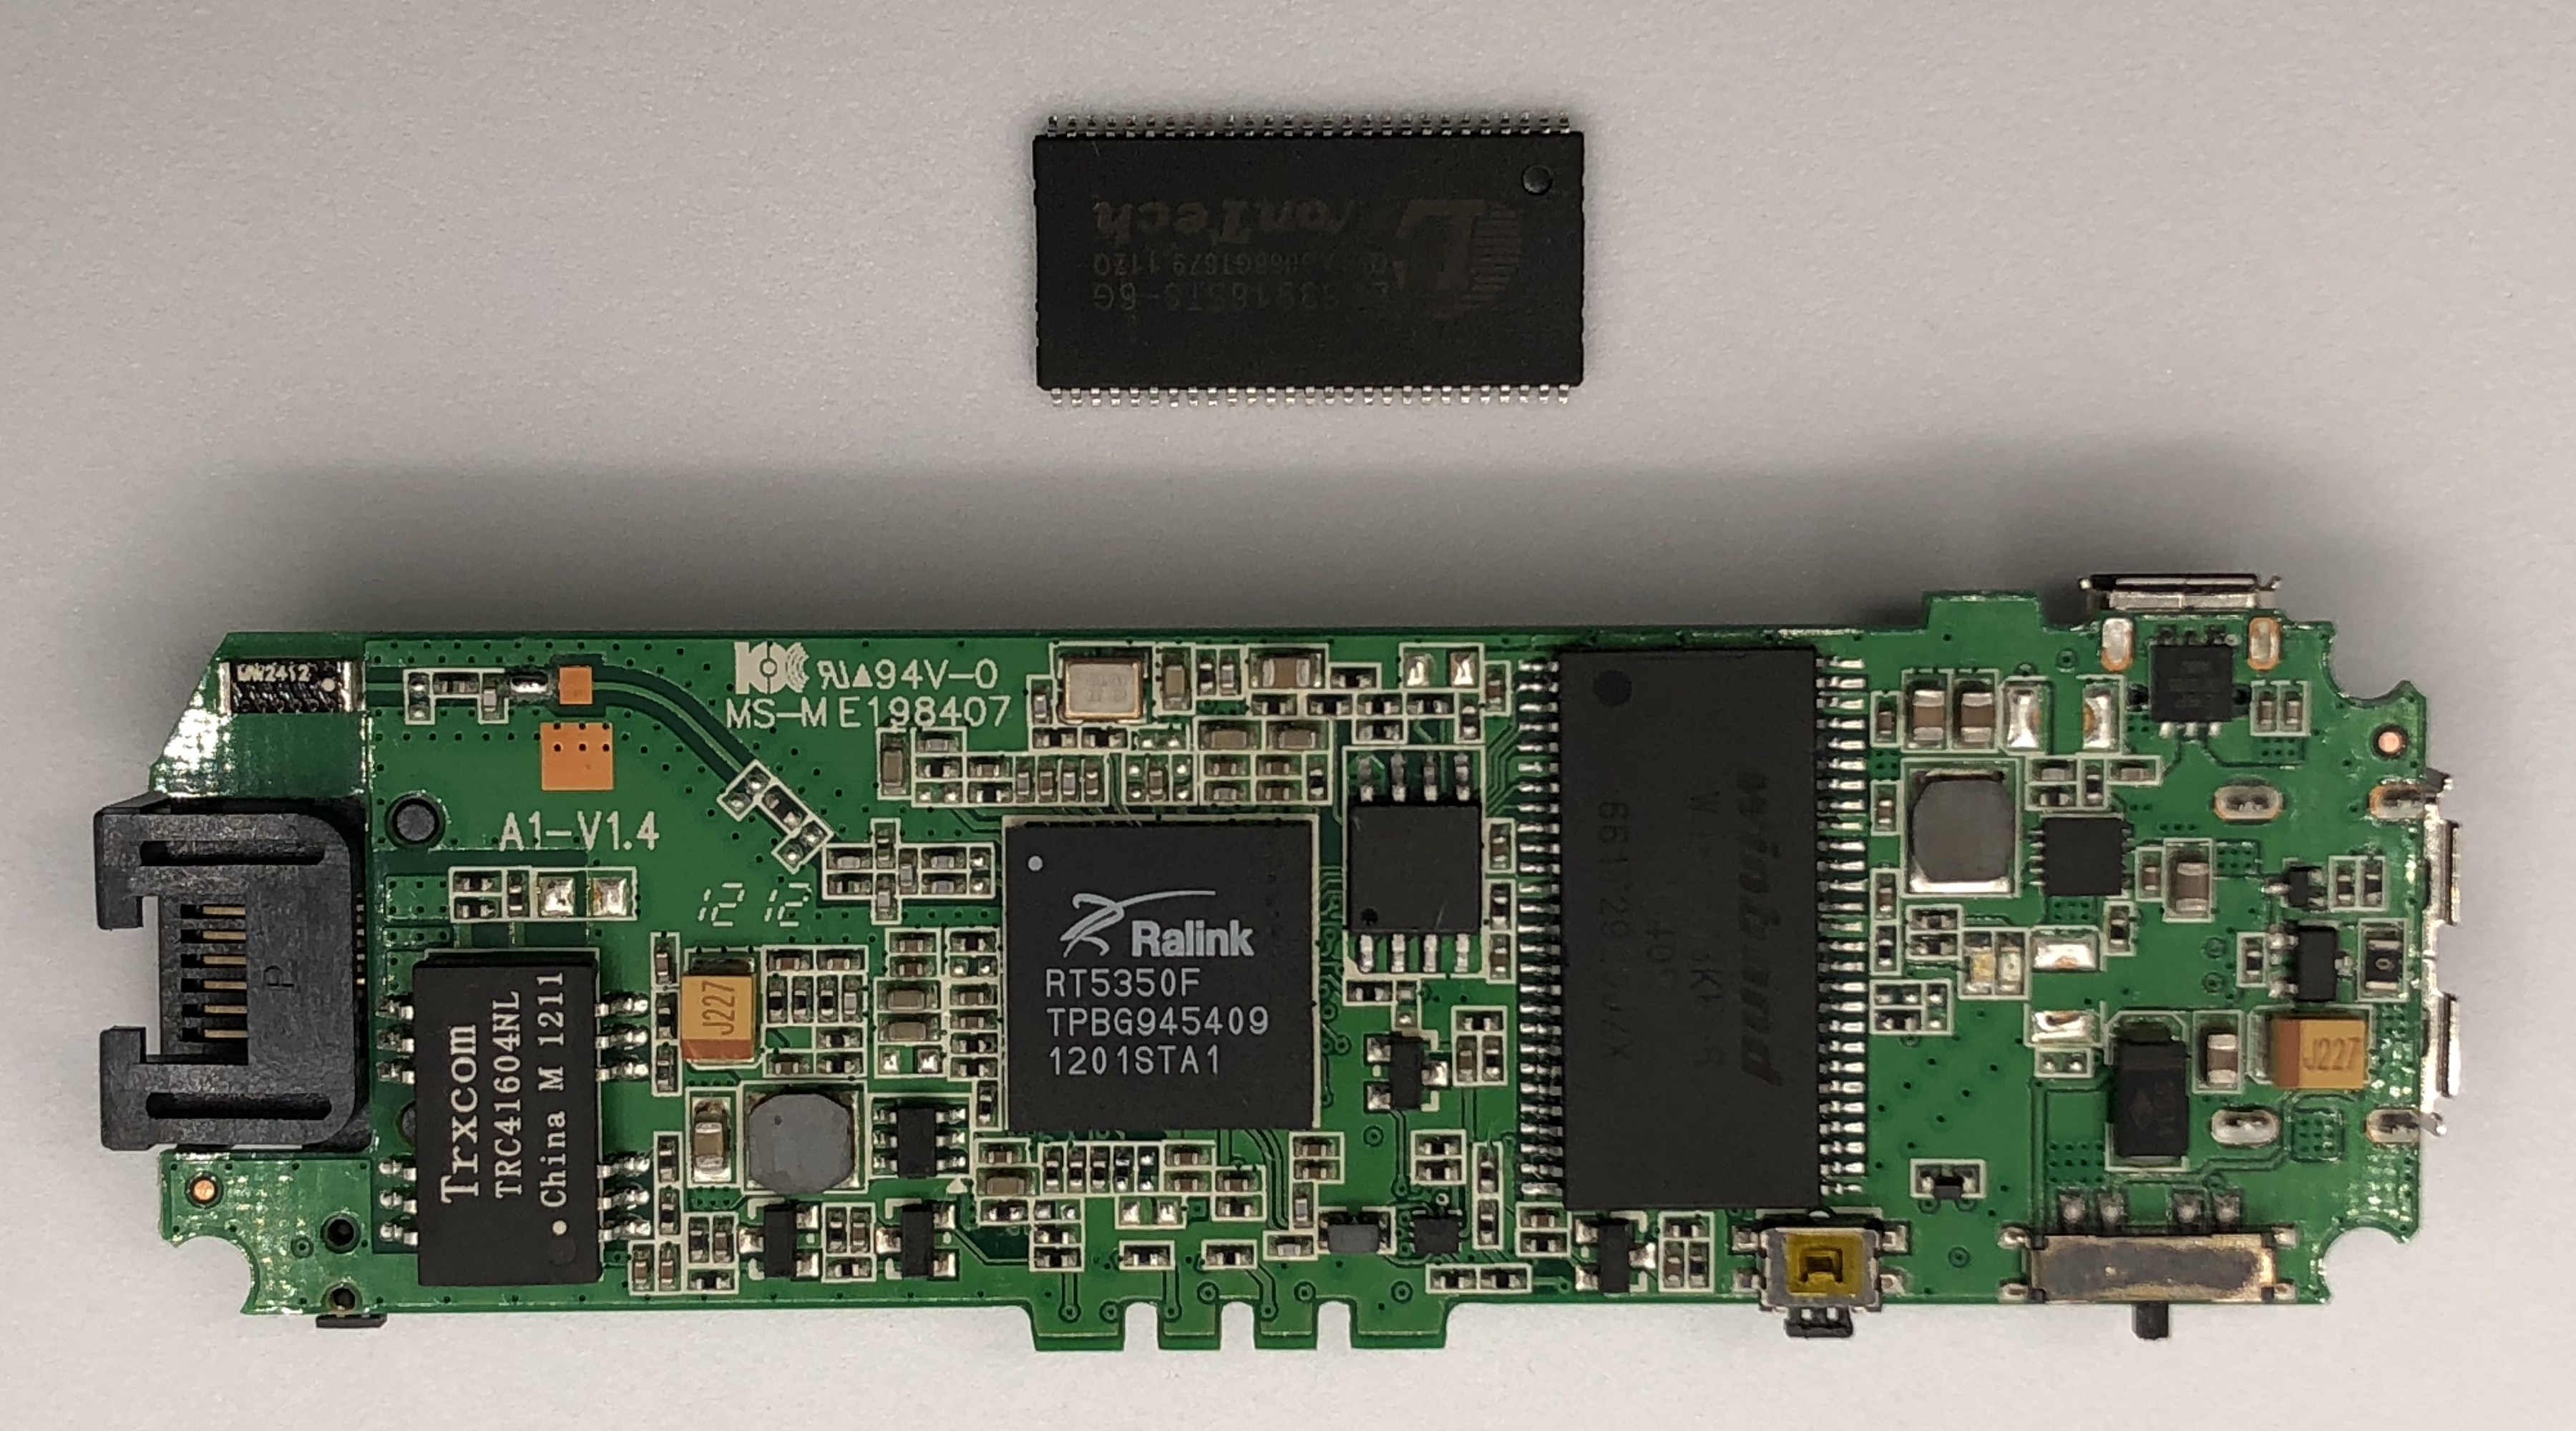
The MPR-A1 and the MPR-A2 are almost identical devices aside from having less storage, memory and a smaller battery. In fact OpenWrt builds for A2 will work on the A1 if you upgrade its NOR flash and DRAM. I’ll be putting in 8MB of NOR flash and 32MB of DRAM to match the MPR-A2. Disassembling the MPR-A1 was fairly straightforward, so no photos were taken during the teardown process.
The new NOR flash was not soldered back until I spliced the firmware and wrote the new firmware image to the flash. Board images are all placed here for the sake of better organization.
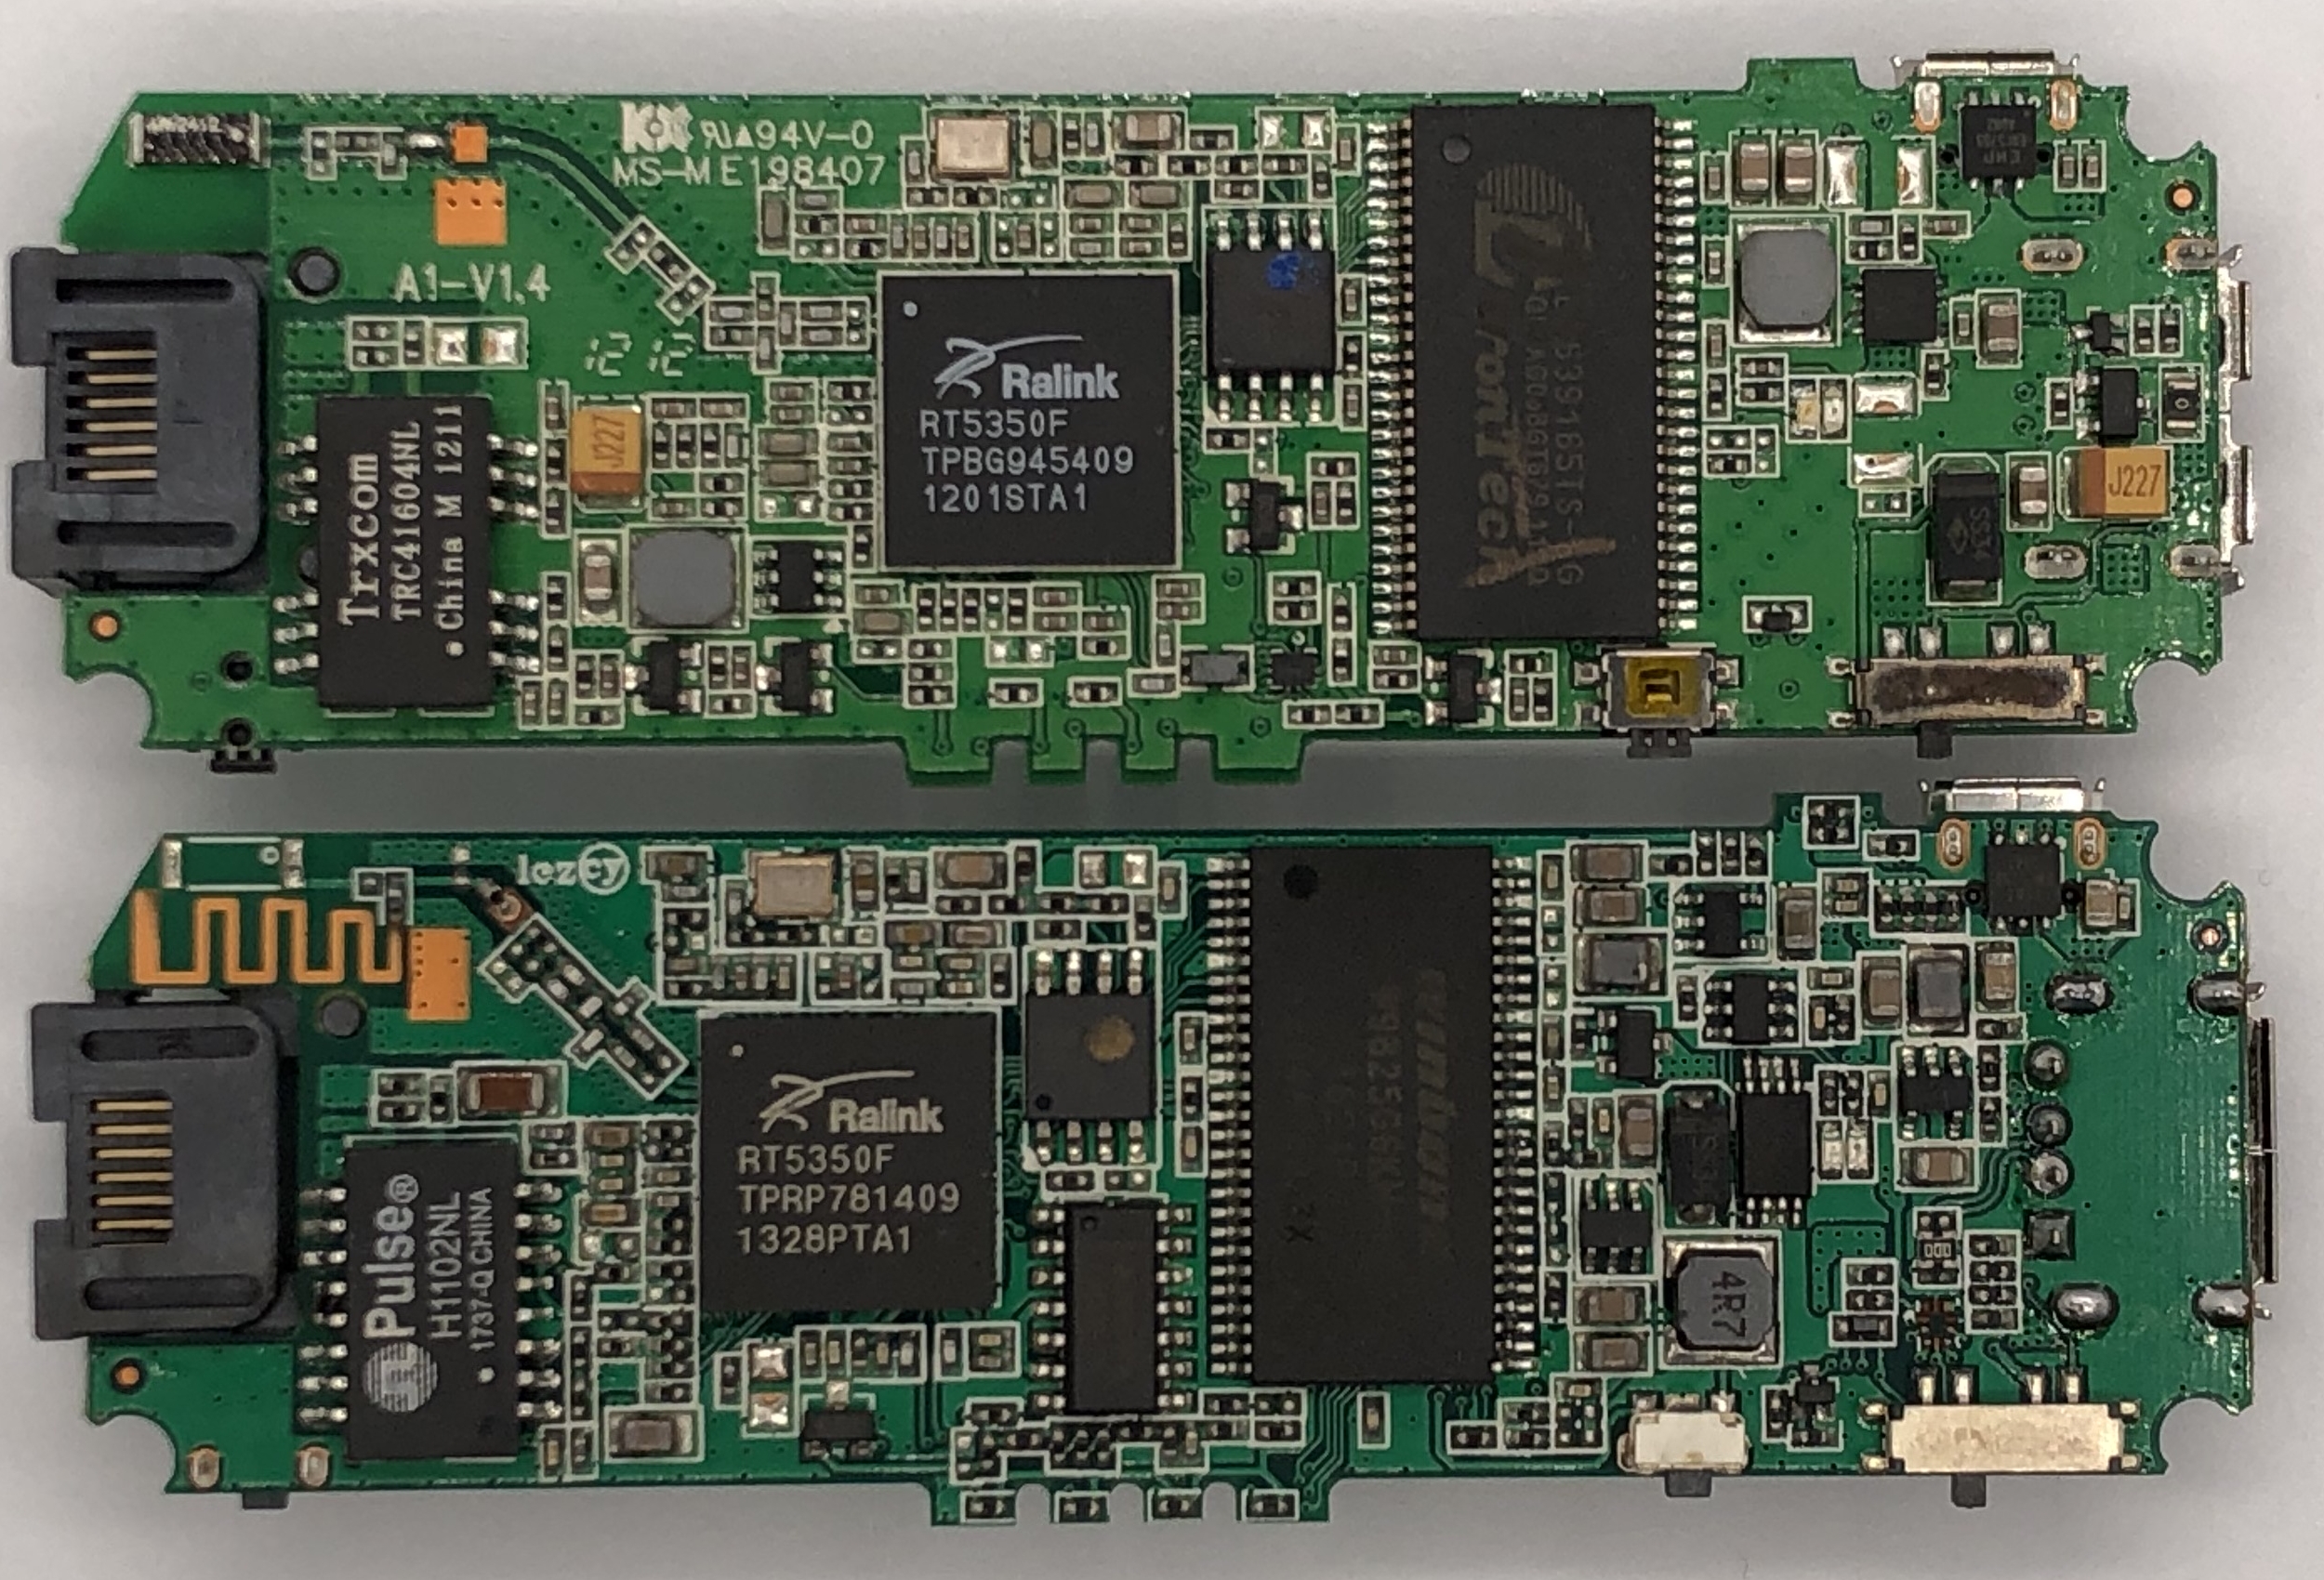
I just happened to have an MPR-A2 clone, so I thought I’d put the two PCBs together as a comparison too. It’s interesting to see the clone opted for cheaper parts in some places to cut costs. I won’t be working on the clone as it already has 8MB of NOR flash and 32MB of DRAM.
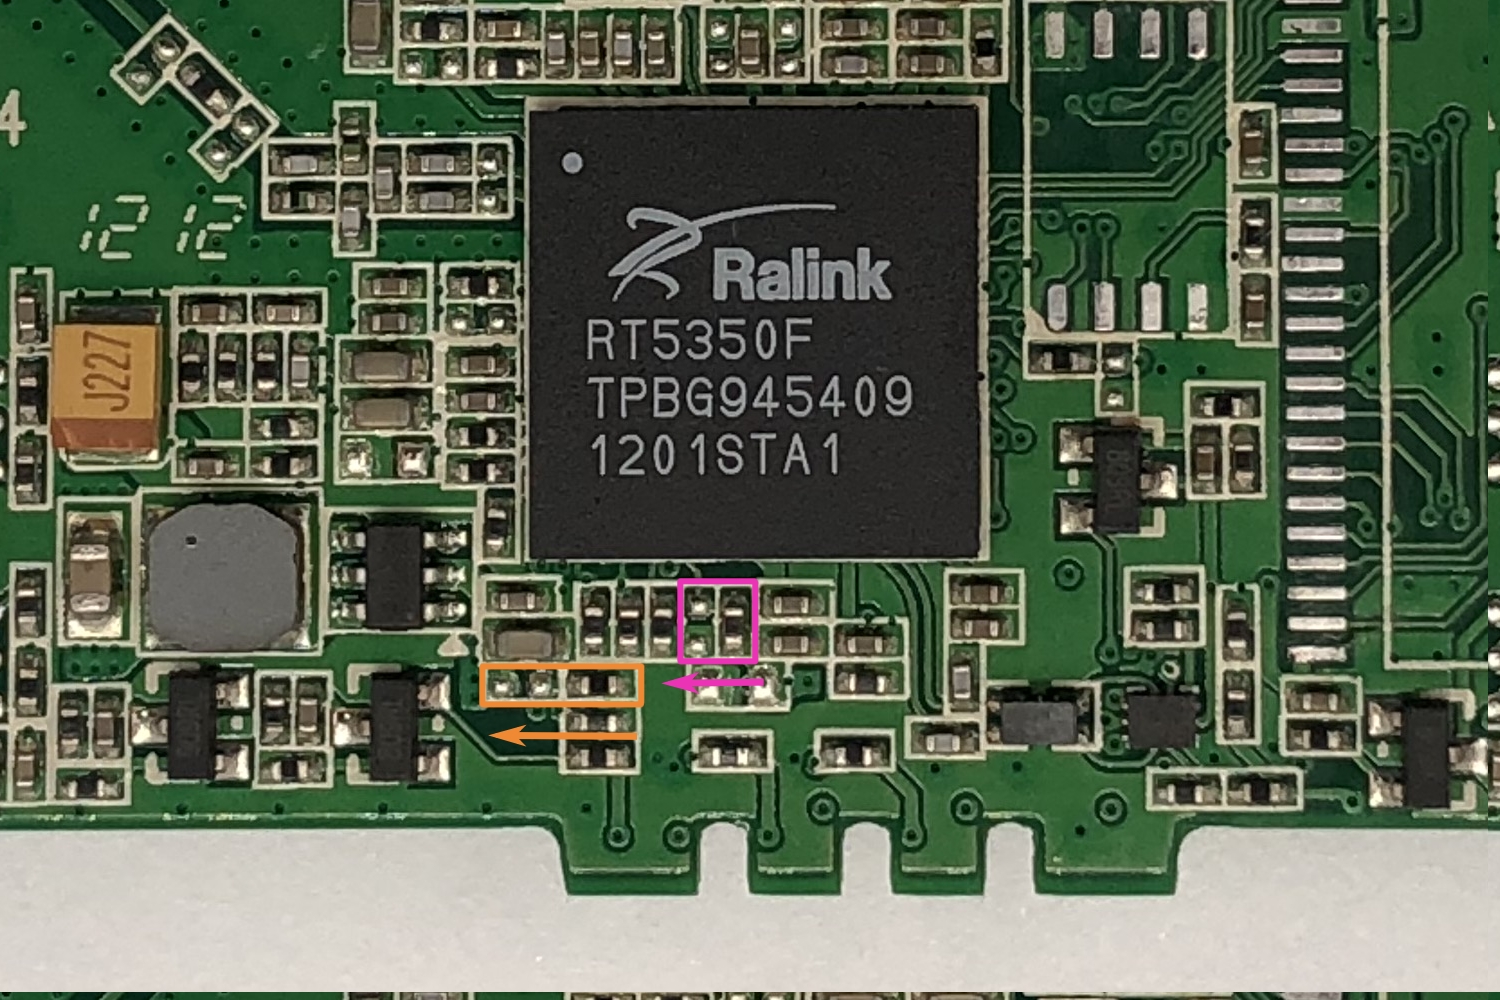
According to the RT5350F’s datasheet, DRAM configuration is either set in EEPROM, or configured externally via two bootstrapping pins. In MPR-A1’s case, it’s configured via those two bootstrapping pins. Unfortunately, this SoC cannot properly address one single 64MB DRAM chip (only 32MB*2), so 32MB is as good as it gets.

For the MR11U, upgrading is much easier, since the bootloader can auto-detect the DRAM configuration and there are no bootstrapping pins to worry about. The datasheet of the SoC says the maximum supported flash size is 16MB, and the maximum supported DRAM size is 64MB, so that’s what I put in.
I won’t go over the setup process here, the wiki does a pretty good job explaining that. After the source has been cloned, I did the following to build my firmware image:
# check out the v19.07.7 branch
$ git checkout v19.07.7
# clean, update and force install all package feeds
# -f is required because some packages won't show up as they contain files that may
# override built-in packages, and this behavior is typically disallowed by default
$ scripts/feeds clean && scripts/feeds update -a && scripts/feeds install -af
This is the configuration that was used for the upgraded MPR-A1. Since I’m borrowing the config for the MPR-A2, no further changes to the source code is required, as the new flash that was put in matches the capacity of the MPR-A2. The change in DRAM will get picked up by the bootloader and passed onto the kernel thanks to the new bootstrapping configuration. On top of the defaults, only ECC and compression support in dropbear were enabled, and some USB serial drivers, picocom, shadow-utils (because creating a separate user is desirable) and LuCI (the web configuration interface) were added.
CONFIG_TARGET_ramips=y
CONFIG_TARGET_ramips_rt305x=y
CONFIG_TARGET_ramips_rt305x_DEVICE_mpr-a2=y

CONFIG_DEVEL=y
CONFIG_CCACHE=y

# enable ECC and compression support in dropbear
CONFIG_DROPBEAR_ECC=y
CONFIG_DROPBEAR_ECC_FULL=y
CONFIG_DROPBEAR_ZLIB=y

# enable luci
CONFIG_PACKAGE_luci=y

# USB serial drivers
CONFIG_PACKAGE_kmod-usb-acm=y
CONFIG_PACKAGE_kmod-usb-serial=y
CONFIG_PACKAGE_kmod-usb-serial-ch341=y
CONFIG_PACKAGE_kmod-usb-serial-cp210x=y
CONFIG_PACKAGE_kmod-usb-serial-ftdi=y
CONFIG_PACKAGE_kmod-usb-serial-pl2303=y

# terminal software
CONFIG_PACKAGE_picocom=y

# enable shadow_utils
CONFIG_PACKAGE_shadow-utils=y
After writing these to .config in the root directory of the source tree, simply running make defconfig will tell the build system to automatically resolve dependencies and complete the config file.
$ make defconfig
# download all of the required source archives
$ make download -j10
# compile the image, running with a high nice value to avoid stalling other applications on the system
$ nice -n 19 make -j$(nproc)
Unfortunately, the build quickly failed. Running make V=s -j1 revealed the problem originated from build_dir/host/mklibs-0.1.35, whose makefile is tools/mklibs/Makefile.
In file included from elf_data.hpp:24,
                 from elf.cpp:21:
elf.hpp:52:56: error: ISO C++17 does not allow dynamic exception specifications
   52 |       const section &get_section(unsigned int i) const throw (std::out_of_range) { return *sections.at(i); };
      |                                                        ^~~~~
elf.hpp:62:47: error: ISO C++17 does not allow dynamic exception specifications
   62 |       static file *open(const char *filename) throw (std::bad_alloc, std::runtime_error);
      |                                               ^~~~~
elf.hpp:65:38: error: ISO C++17 does not allow dynamic exception specifications
   65 |       file(uint8_t *mem, size_t len) throw (std::bad_alloc) : mem(mem), len(len) { }
      |                                      ^~~~~
elf.hpp:68:52: error: ISO C++17 does not allow dynamic exception specifications
   68 |         static file *open_class(uint8_t *, size_t) throw (std::bad_alloc, std::runtime_error);
      |                                                    ^~~~~
elf.hpp:131:55: error: ISO C++17 does not allow dynamic exception specifications
  131 |         std::string get_string(uint32_t offset) const throw (std::bad_alloc)
      |                                                       ^~~~~
elf.hpp:266:39: error: ISO C++17 does not allow dynamic exception specifications
  266 |       std::string get_version() const throw (std::bad_alloc);
      |                                       ^~~~~
elf.hpp:267:44: error: ISO C++17 does not allow dynamic exception specifications
  267 |       std::string get_version_file() const throw (std::bad_alloc);
      |                                            ^~~~~
elf.hpp:269:44: error: ISO C++17 does not allow dynamic exception specifications
  269 |       std::string get_name_version() const throw (std::bad_alloc);
      |                                            ^~~~~
elf.hpp:308:29: error: ISO C++17 does not allow dynamic exception specifications
  308 |       version_requirement() throw (std::bad_alloc);
      |                             ^~~~~
----------snip----------
make[7]: *** [Makefile:382: elf.o] Error 1
I checked what the upstream Makefile looks like on 21.02, and it seems like HOST_CPPFLAGS += -std=gnu++98 needs to be set in my makefile. Further inspection reveals that the 0.1.35 version does not even exist on Debian’s server anymore, so I upgraded the version number, archive extension (.xz instead of .gz) and the hash corresponding to v0.1.44 as well.
diff --git a/tools/mklibs/Makefile b/tools/mklibs/Makefile
index 507c2fd394..48b1eace40 100644
--- a/tools/mklibs/Makefile
+++ b/tools/mklibs/Makefile
@@ -7,17 +7,18 @@
 include $(TOPDIR)/rules.mk

 PKG_NAME:=mklibs
-PKG_VERSION:=0.1.35
+PKG_VERSION:=0.1.44

-PKG_SOURCE:=$(PKG_NAME)_$(PKG_VERSION).tar.gz
+PKG_SOURCE:=$(PKG_NAME)_$(PKG_VERSION).tar.xz
 PKG_SOURCE_URL:=http://ftp.de.debian.org/debian/pool/main/m/mklibs/
-PKG_HASH:=ccb1023dc1729c5a37ca6c3eca8e4bac3491116763c8820dfce8eea4845c8567
+PKG_HASH:=3af0b6bd35e5b6fc58d8b68827fbae2ff6b7e20dd2b238ccb9b49d84722066c2

 HOST_FIXUP:=autoreconf

 include $(INCLUDE_DIR)/host-build.mk

 HOST_CFLAGS += -I$(CURDIR)/include
+HOST_CPPFLAGS += -std=gnu++98

 define Host/Install
        $(INSTALL_BIN) \
After deleting build_dir/host/mklibs-0.1.35 and re-running the build process, everything worked out this time, and a sysupgrade image was generated at bin/targets/ramips/rt305x/openwrt-ramips-rt305x-mpr-a2-squashfs-sysupgrade.bin. I’ll put that aside for now and compile an image for the TP-Link device.
For the TP-Link TL-MR11U, a little modification to the source is required. The upgraded DRAM does not require any changes since it’s auto-detected by the bootloader and then passed onto the kernel, but for the flash size, I need to change the build target of this device to make sure the 16MB flash layout is selected. For the old ar71xx target, it’s as simple as changing which macro this device’s definition points to. My hardware revision is v2, but the v2 definition points to v1, so it’s v1 that I would need to change.
diff --git a/target/linux/ar71xx/image/tiny-tp-link.mk b/target/linux/ar71xx/image/tiny-tp-link.mk
index 9612694469..a38df7f5af 100644
--- a/target/linux/ar71xx/image/tiny-tp-link.mk
+++ b/target/linux/ar71xx/image/tiny-tp-link.mk
@@ -13,7 +13,7 @@ endef
 TARGET_DEVICES += tl-mr10u-v1

 define Device/tl-mr11u-v1
-  $(Device/tplink-4mlzma)
+  $(Device/tplink-16mlzma)
   DEVICE_TITLE := TP-LINK TL-MR11U v1
   DEVICE_PACKAGES := kmod-usb-core kmod-usb2 kmod-usb-ledtrig-usbport
   BOARDNAME := TL-MR11U
This is very important for the ar71xx target, much more important than the previous device, which was rampis, as I will elaborate in the firmware splicing part below.
Thear71xxtarget has now been dropped due to it being mostly replaced by the newer, device-tree basedath79target. However, not all devices have been ported toath79.
The configuration is very similar to the previous device:
CONFIG_TARGET_ar71xx=y
CONFIG_TARGET_ar71xx_tiny=y
CONFIG_TARGET_ar71xx_tiny_DEVICE_tl-mr11u-v2=y

CONFIG_DEVEL=y
CONFIG_CCACHE=y

# enable ECC and compression support in dropbear
CONFIG_DROPBEAR_ECC=y
CONFIG_DROPBEAR_ECC_FULL=y
CONFIG_DROPBEAR_ZLIB=y

# enable luci
CONFIG_PACKAGE_luci=y

# USB serial drivers
CONFIG_PACKAGE_kmod-usb-acm=y
CONFIG_PACKAGE_kmod-usb-serial=y
CONFIG_PACKAGE_kmod-usb-serial-ch341=y
CONFIG_PACKAGE_kmod-usb-serial-cp210x=y
CONFIG_PACKAGE_kmod-usb-serial-ftdi=y
CONFIG_PACKAGE_kmod-usb-serial-pl2303=y

# terminal software
CONFIG_PACKAGE_picocom=y

# enable shadow_utils
CONFIG_PACKAGE_shadow-utils=y
Now to build the firmware:
# complete configuration
$ make defconfig
# clean built artifacts
$ make clean
# download all of the required source archives
$ make download -j10
# compile the image, running with a high nice value to avoid stalling other applications on the system
$ nice -n 19 make -j$(nproc)
Now I have the image at bin/targets/ar71xx/tiny/openwrt-ar71xx-tiny-tl-mr11u-v2-squashfs-factory.bin.
First, both chips I took off from the devices was dumped with my SPI flash programmer and flashrom. The flash programmer used here is an excellent open-source project: stm32-vserprog. The repository has both hardware and firmware designs. This can read and write chips much faster than the CH341 based programmers, and it’s quite easy to assemble.
These two devices are both MIPS, but that’s pretty much where the similarities end. The firmware setup for these two devices are completely different, so two different appaoches were required to splice things together and put back onto the new NOR flash.
Generally speaking, a wireless router/access point type embedded Linux system like this would have a couple of partitions:
- bootloader (u-boot in both devices mentioned here)
- bootloader environment variables (optional, sometimes stored within the bootloader partition)
- RF calibration data for the Wi-Fi radio (MAC addresses are commonly stored here too)
- kernel
- rootfs (typically read-only)
- overlay (where the user configuration is saved, and mounted as overlay on top of the read-only rootfs)
It’s worth noting that wireless calibration data must be preserved, because this is unique on a per-board basis. This is why cross-flashing other people’s full flash dumps as-is is typically not a good idea, because you will end up with subpar RF performance and wrong MAC addresses, not to mention potentially violating FCC (or the local equivalent) regulations, and why it’s always recommended having a full image backup of the flash before tinkering with any devices.
First, I need to cut up the stock firmware dump to individual partition images according to the partition table for use later. This can be simply accomplished with dd if=A1_full_dump.bin of=$PARTITION_NAME bs=1 count=$SIZE_IN_BYTES skip=$START_OFFSET_IN_BYTES, or simply selecting, copying and pasting data in a hex editor.
partitions {
			compatible = "fixed-partitions";
			#address-cells = <1>;
			#size-cells = <1>;

			partition@0 {
				label = "u-boot";
				reg = <0x0 0x30000>;
				read-only;
			};

			partition@30000 {
				label = "u-boot-env";
				reg = <0x30000 0x10000>;
				read-only;
			};

			factory: partition@40000 {
				label = "factory";
				reg = <0x40000 0x10000>;
				read-only;
			};

			partition@50000 {
				compatible = "denx,uimage";
				label = "firmware";
				reg = <0x50000 0x3b0000>;
			};
For this SoC, a modified bootloader is also required to make use of the 32MB of DRAM according to old forum posts.
So overall the only two partitions required from the original flash image would be u-boot-env and factory. u-boot-env contains configuration for the bootloader that I don’t need to modify, factory is the conventional radio calibration data and MAC address storage partition for Ralink (and MediaTek MIPS) devices.
The sysupgrade image generated by the build system is actually a complete uImage directly bootable by the bootloader, with the rootfs squashfs image appended after it. All I needed to do is writing this to 0x50000 of the flash. This sysupgrade file does have some trailing metadata, but these will be automatically erased when the overlay partition is automatically reformatted on first boot, thus it can be safely ignored.
$ file bin/targets/ramips/rt305x/openwrt-ramips-rt305x-mpr-a2-squashfs-sysupgrade.bin
bin/targets/ramips/rt305x/openwrt-ramips-rt305x-mpr-a2-squashfs-sysupgrade.bin: u-boot legacy uImage, Linux Kernel Image, Linux/MIPS, OS Kernel Image (lzma), 1280356 bytes, Mon Feb 15 15:22:37 2021, Load Address: 0x80000000, Entry Point: 0x80000000, Header CRC: 0x2D529961, Data CRC: 0x804D50B5
Now that I have all the data, it’s time to reconstruct a bootable full flash image. While this could have been more convenient to do in a GUI hex editor, it would be easier to explain what’s going on if it was done with dd. The firmware partition of MPR-A2 is 0x7b0000 in size instead of 0x3b0000, but otherwise they have identical flash layouts.
# Take the modified bootloader binary that can use 32MB of DRAM, and generate a padding to pad it to 0x30000 with 0xFF.
$ FILE="uboot256.img" dd if=/dev/zero bs=1 count=$((0x30000 - $(stat --format=%s $FILE))) |tr \\000 \\377 > u-boot_padding
91104+0 records in
91104+0 records out
91104 bytes (91 kB, 89 KiB) copied, 0.0971852 s, 937 kB/s

# Concatenate the padding with the u-boot image
$ cat uboot256.img u-boot_padding > u-boot_partition

# Concatenate the u-boot partiton (now with the correct size), u-boot environment variable partition the wireless calibration data parition together.
$ cat u-boot_partition u-boot-env factory > header

# Generate a padding filled with 0xFF to pad the frimware partiton to the correct size
$ FILE="openwrt-ramips-rt305x-mpr-a2-squashfs-sysupgrade.bin" dd if=/dev/zero bs=1 count=$((0x7b0000 - $(stat --format=%s $FILE))) |tr \\000 \\377 > firmware_padding
3865866+0 records in
3865866+0 records out
3865866 bytes (3.9 MB, 3.7 MiB) copied, 1.49983 s, 2.6 MB/s

# Concatenate the sysupgrade image with the padding
$ cat openwrt-ramips-rt305x-mpr-a2-squashfs-sysupgrade.bin firmware_padding > firmware_partiton

# Concatenate everything together
$ cat header firmware_padding > full.bin

# Write the assembled full image to the new flash chip
$ flashrom -p serprog:dev=/dev/ttyACM1:400000000 -w full.bin
With the chip written, it was soldered back onto the board. After cleaning up the board, it was powered on and the system came up as expected. It took about 3 minutes to fully initialize the jffs2 overlay as it needed to erase everything in the overlay partition. Subsequent normal boots take about 1 minute, while being a little slow, is still an acceptable trade-off for the convenience.
[   78.870911] jffs2_scan_eraseblock(): End of filesystem marker found at 0x0
[   78.926935] jffs2_build_filesystem(): unlocking the mtd device...
[   78.927077] done.
[   78.943362] jffs2_build_filesystem(): erasing all blocks after the end marker...
[   80.627250] br-lan: port 1(eth0) entered blocking state
[   80.652812] br-lan: port 1(eth0) entered disabled state
[   80.663982] device eth0 entered promiscuous mode
[   80.838653] br-lan: port 1(eth0) entered blocking state
[   80.849204] br-lan: port 1(eth0) entered forwarding state
[   80.860561] IPv6: ADDRCONF(NETDEV_UP): br-lan: link is not ready
[   82.058579] IPv6: ADDRCONF(NETDEV_CHANGE): br-lan: link becomes ready
[  177.313272] done.
[  177.317307] jffs2: notice: (1135) jffs2_build_xattr_subsystem: complete building xattr subsystem, 0 of xdatum (0 unchecked, 0 orphan) and 0 of xref (0 dead, 0 orphan) found.
[  177.746829] overlayfs: upper fs does not support tmpfile.
This device requires a different approach. Since the factory bootloader can auto-detect the 64MB of DRAM that was put in, and I can simply apply openwrt-ar71xx-tiny-tl-mr11u-v2-squashfs-factory.bin from the stock TP-Link firmware, all it would be required was mirroring the ART (Atheros Radio Test, wireless calibration data) partition to where it should be on a 16MB device. On these Atheros based devices, ART is commonly simply located in the last 64KB of the flash, and this device is no exception.
Doing this one with dd would be slightly more difficult than the previous one and would require more messy arithmetic operations, so I didn’t bother with this one and simply used a hex editor to do the job. Basically, the gist is:
- Create a new 16MB file filled with 0xFF
- Open the original 4MB flash dump and copy it to the beginning of the 16MB file in overwrite mode
- Copy the last 64KB of the original flash dump to the last 64KB of the new 16MB file in overwrite mode
After the 16MB OpenWrt image was flashed onto the device, it will automatically pick up the new ART data which was placed at the end of the new 16MB flash. Now all I need to do was writing this image to the new 16MB chip and soldering it back to the board.
# Write the assembled full image to the new flash chip
$ flashrom -p serprog:dev=/dev/ttyACM1:400000000 -w full.bin
This board came up and finished erasing the overlay slightly faster than the other device, only taking a little over 2 minutes to initialize the overlay. Just like the previous device, normal boots take about 1 minute, while being a little slow, is still an acceptable trade-off for the convenience.
[   90.206076] jffs2_scan_eraseblock(): End of filesystem marker found at 0x0
[   90.211744] jffs2_build_filesystem(): unlocking the mtd device...
[   90.211818] done.
[   90.219575] jffs2_build_filesystem(): erasing all blocks after the end marker...
[   90.859188] br-lan: port 1(eth0) entered blocking state
[   90.870509] br-lan: port 1(eth0) entered disabled state
[   90.876126] device eth0 entered promiscuous mode
[   90.927039] IPv6: ADDRCONF(NETDEV_UP): br-lan: link is not ready
[   94.978202] eth0: link up (100Mbps/Full duplex)
[   94.981345] br-lan: port 1(eth0) entered blocking state
[   94.986506] br-lan: port 1(eth0) entered forwarding state
[   95.026917] IPv6: ADDRCONF(NETDEV_CHANGE): br-lan: link becomes ready
[  136.089805] done.
[  136.090335] jffs2: notice: (1205) jffs2_build_xattr_subsystem: complete building xattr subsystem, 0 of xdatum (0 unchecked, 0 orphan) and 0 of xref (0 dead, 0 orphan) found.
[  136.393070] overlayfs: upper fs does not support tmpfile.
I wrote a simple shell script that prints the current driver used and then calls picocom with one of the two possible serial adapter device nodes it finds. This can be set to a user’s login shell, so I won’t have to specify long commands when connecting to the device over ssh.
#!/bin/sh

OPTION1=/dev/ttyUSB0
OPTION2=/dev/ttyACM0
DEFAULT_BAUDRATE=115200

if [ -c "$OPTION1" ]; then
    ADAPTER=$OPTION1
elif [ -c "$OPTION2" ]; then
    ADAPTER=$OPTION2
else
    echo "No serial adapter found."
    exit
fi

echo "Using $ADAPTER at $DEFAULT_BAUDRATE baud."
echo "Driver: $(basename $(readlink /sys/class/tty/$(basename $ADAPTER)/device/driver))"
echo -e "Press [C-b] to change the baudrate. \n"
exec /usr/bin/picocom --send-cmd '' --receive-cmd '' -b $DEFAULT_BAUDRATE $ADAPTER
After setting up the root password and wireless credentials, I copied my script to /usr/bin/serial_terminal to the device with scp and did some basic setup over SSH.
# set the script to executable
chmod +x /usr/bin/serial_terminal

# add a user called "uart" in the dialout group, whose login shell is my serial terminal script
useradd -g dialout -d /home/uart --create-home --shell /usr/bin/serial_terminal uart

# set a secure password for the "uart" user
passwd uart

# add new "shell" to the list of allowed shells
echo "/usr/bin/serial_terminal" >> /etc/shells

# add all of the files midified so far to sysupgrade.conf so they persist through factory resets
echo "/etc/shells" >> /etc/sysupgrade.conf
echo "/usr/bin/serial_terminal" >> /etc/sysupgrade.conf
echo "/home" >> /etc/sysupgrade.conf
Unfortunately, I was not able to get public key ssh authentication working properly on 19.07. Setting PubkeyAcceptedKeyTypes +ssh-rsa with ECC keys or switching to RSA keys silenced send_pubkey_test: no mutual signature algorithm from my client, but dropbear is always giving me authpriv.warn dropbear[1759]: Pubkey auth attempt with unknown algo for 'root' from xxx no matter what I tried, so I didn’t investigate further and thought dropbear on here is simply too old.
After everything has been set up, this is the final result. All of these devices are functionally identical as far as the use case is concerned, so there is only one demo. I connected to the device over ssh, powered up the target board connected to the serial adapter, and then ran htop to demonstrate psuedo-GUI applications mostly work pretty well here.
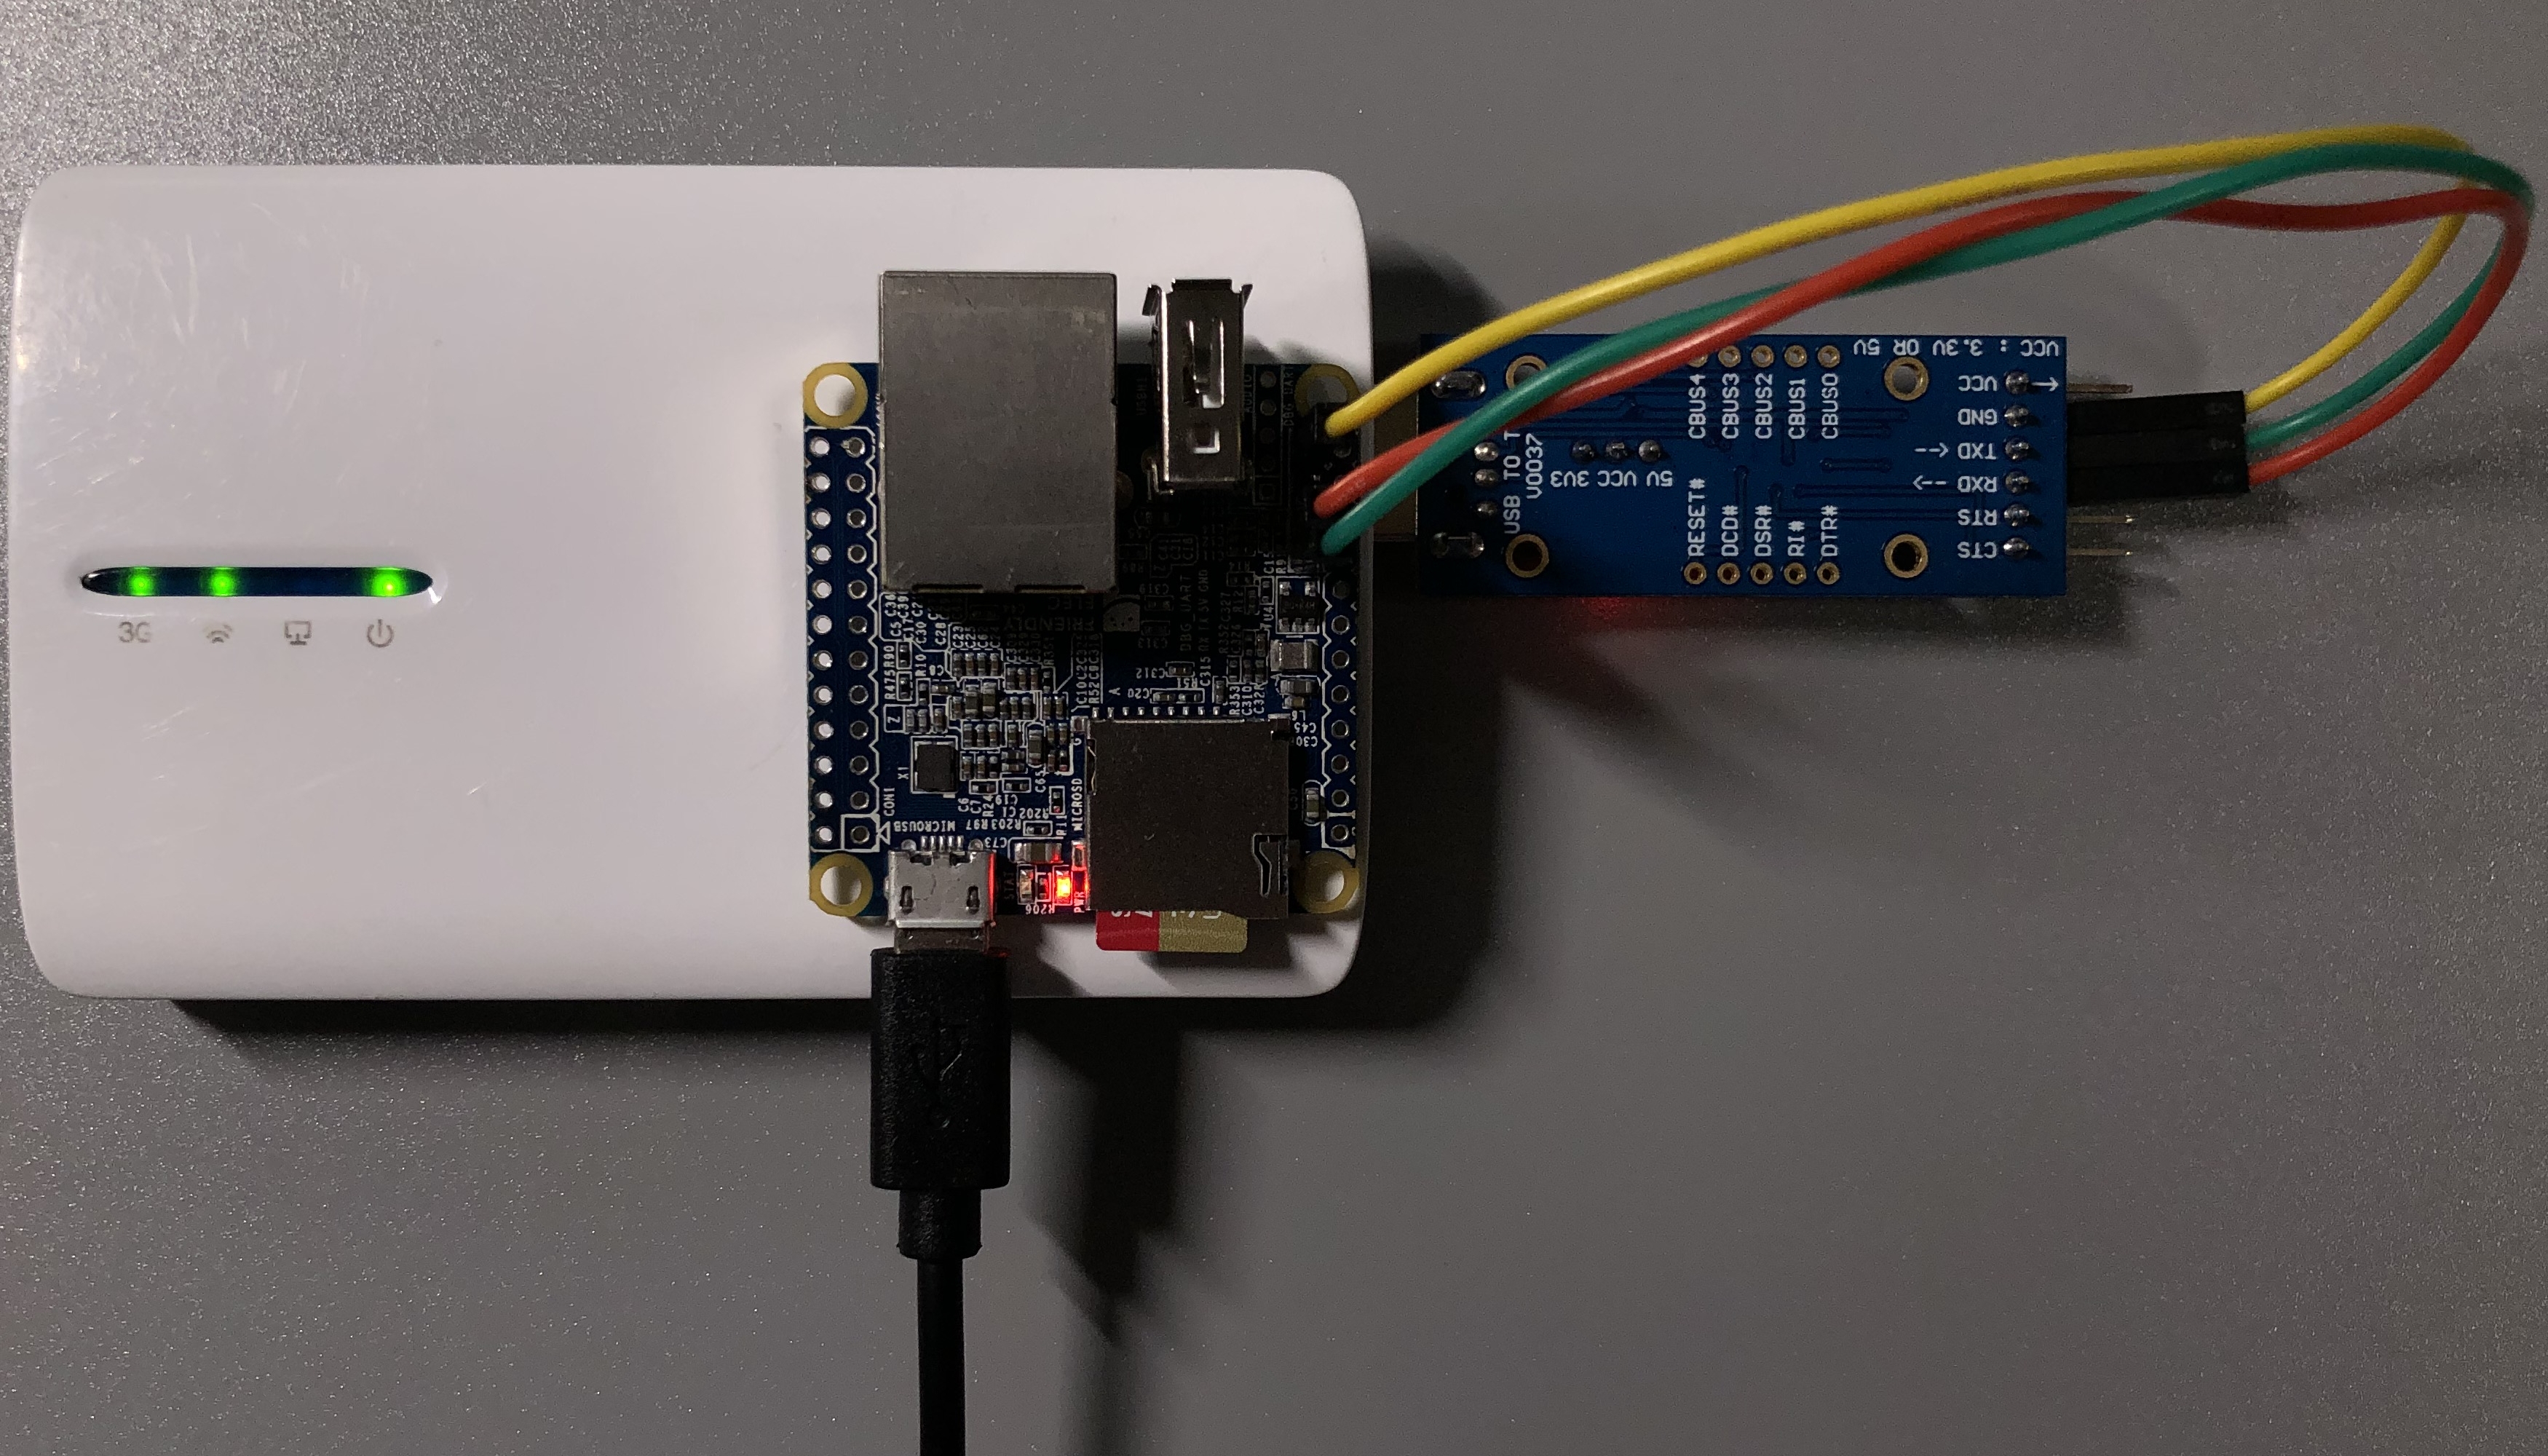

Unfortunately it seems like fast-updating animated SVG like this will slow down Chromium and cause high CPU usage, so I couldn’t make it visible by default to avoid the page from consuming people’s hardware resources when it’s not meant to.

- Adding Bluetooth serial capabilities. While I don’t have much use for this feature, I can see it being useful for other people.
- Forwarding the raw character device over SSH instead of running
picocomon the remote. ttcssh will do what I want, but setup seems very convoluted for a non-essential feature, so I didn’t feel like setting this up here. - Upgrading to OpenWrt v21.02 and hopefully fix SSH public key login.